Kashoo Accounting integration

How do I integrate Kashoo with Payroll?
-
Official comment

Integrating Kashoo and Payroll
Kashoo and Payroll now provide you with an easy, integrated way to manage your company’s finances and payroll. Kashoo provides essential bookkeeping, invoicing and financial records for your business. Payroll provides robust payroll and payment processing. Together, you can pay your employees, remit the right payroll taxes and manage your company’s finances.
If you are not familiar with charts of accounts or general ledger codes, please see http://help.paymentevolution.com/entries/23227686
Video overview

Getting started
You’ll need a Kashoo account. If you don’t have a Kashoo account, you can register for one at https://kashoo.com/paymentevolution
To get started, login to your Payroll account. If you don’t have an account, sign up at https://secure.paymentevolution.com
-
Go to the SETTINGS menu and select ADD-ONS. Enable the ADD-ON you wish – in this case, Kashoo.

-
You will be prompted to login to Kashoo using your Kashoo credentials (username and password). Click "ALLOW" to confirm you want to integrate. You will then you will be re-directed back to Payroll to continue the setup process.
-
Next we need to synchronize your chart of accounts between Kashoo and Payroll. Go to SETTINGS -> PAYROLL OPTIONS and navigate to the GL tab

-
Click on the IMPORT FROM OTHER SERVICE button.
-
Next the system will start the integration process with Kashoo by asking you to confirm your provider.

-
If you have multiple businesses registered in Kashoo, you will be asked to select the business to connect to Payroll.

Now you can synchronize your Kashoo chart of accounts with the Payroll General Ledger (GL). Use the drop down lists to match the fields to the appropriate accounts imported from Kashoo.
-
Your GL import and synchronization is now complete once you SAVE. You can now process a payrun on the Payroll site. To do so, click RUN PAYROLL and finish your payroll as you normally would.
-
When you are ready to import your transactions into KASHOO, either click ACTIONS -> END OF PERIOD or start a new payrun. The system will prompt you to send your recent transactions into Kashoo.

Payroll will send Kashoo any transactions you’ve done since you’ve last closed your payroll period. Older transactions in periods that you’ve already closed can be imported via REPORTS -> GL REPORTS. Just click the export button beside the report you wish to export to Kashoo.
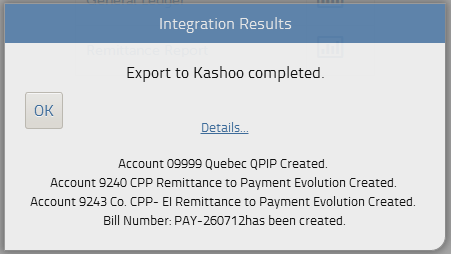
-
If you are using the Kashoo iPad app skip to step 14.
Now the next time you log into Kashoo, navigate to the EXPENSES area.
You’ll see a draft expense which you can view:

This contains your payroll transactions. Ensure all the line items are correctly matched to the accounts in Kashoo and approve your invoice. -
The next steps require you to know if you will be using a payroll clearing account to reconcile your payroll transactions. You may want to consult your bookkeeper or accountant to determine if you should use one in your business.
-
If you are using a payroll clearing _account, your expense in Kashoo will be a zero-balance expense. Specifically, you'll see two line items, "Payroll Clearing" and "Remittance to Payroll" as negative amounts - allocate these to the appropriate accounts in Kashoo (ie your _payroll clearing account).

-
If you prefer not to use payroll clearing and will be reconciling these transactions directly with your bank statements then you'll need to remove two line items: "Payroll Clearing" and "Remittance to Payroll". Adjust the quantity to zero "0" and save the expense as shown below. This method works well if you are enrolled in the Payroll ePay service and are reconciling the transactions against the bank account you use to fund payroll.
Now, when you next import your bank statement, you can reconcile this expense against the payroll debits in that statement. -
That’s it! You've successfully imported your payroll transactions into Kashoo Online Accounting.
-
If you are using the Kashoo iPad app, here's how to view your payroll transactions and reconcile:
- Sync your profile (go to the gear icon / settings area in the app and tap 'sync now')
- Go to the expenses section and you'll see the latest payroll expense from Payroll listed

- Approve the invoice as is, or, if you are not using the payroll clearing account method, modify the expense

- Remove the items Payroll Clearing _and _Remittance to Payroll

- Your expense will now be payable (have a non-zero balance) which you can use to match against the bank transactions in your account

Notes: Transactions can only be posted to Kashoo after you close your payroll remittance period. Authorization to post transactions to your Kashoo account must be done with credentials of an “Admin” in the Kashoo system. Read-only users cannot authorize Payroll data to be sent to Kashoo.
Trouble connecting to Kashoo?
If you are having issues connecting to Kashoo, your connection might need to be re-established. Please log into your account, go to add-ons and delete the Kashoo integration. Re-enable the add-on and follow the steps above to ensure your chart of accounts are mapped properly.
Comment actions -
-

It would be helpful if you could describe how G/L to Chart of Accounts process will work.
Then how should I complete the drop downs:
- Should I be creating accounts in Kashoo first, or does Payroll create the accounts for me as a consequence of hitting Save
- Is it okay that Federal Tax, Provincial Tax, Co Portion QPP, Co Portion QPIP, Co Health Ser F. Vacation, Co Portion QPP, Co Portion QPIP and Co Health Ser F. are all left blank?
- The only thing that I could see to obviously change was the Bank dropdown, to select my bank. Is that the normal case?
Thanks,
Martin.
-
Matching general ledger codes to your chart of accounts is described in step 6 above. Generally, you import your chart of accounts from Kashoo first, then match these using the drop down boxes to our categories. To answer your specific questions:
- You should create your accounts in Kashoo first. Ideally, you should confer with your bookkeeper or accountant to determine what your chart of accounts should look like. If you need a start, we recommend using the Canada Revenue Agency's GIFI reference (see http://www.cra-arc.gc.ca/E/pub/tg/rc4088/README.html). We also recommend setting up your chart of accounts to include the same categories we use - though you may decide to 'group' certain items like taxes into one code for your own records.
- You should match every category against an account in your Kashoo profile. We do not recommend leaving any of them blank. You can, however, set multiple categories to the same Kashoo chart of account code. For example, if you wanted to track both federal and provincial tax as one, you would assign the federal tax category to be the same GL code as provincial tax. When this gets exported to Kashoo, these items would be combined into the same account code for you.
- You should see all the relevant account codes from Kashoo if you've entered your Kashoo token properly and authenticated your profile. If you are not, please contact our support team to investigate.
Please sign in to leave a comment.
Comments
3 comments